Easy Animation Timeline for the rest of us. If you ever had a tough time creating interactive content, this one is for you!
A lot has happened since we launched Beta version of Presenter and today I’m going to share an exciting new feature with you that will allow creation of interactive content easier than ever before. I’m talking about allowing you to take your ideas and visualize them and give them motion in a matter of seconds. Kid you not.
To recap: It’s been 3 months now since we released the Beta version of EWC Presenter. Thousands of projects have been created some pretty darn Awesome and some not so shabby.
Based on your feedback we noticed most of you beginners had a tough time creating professional looking animations. So we took a step back and looked through hundreds of projects created by users, listened to your feedback and took a deeper look at our Animation engine.
Here’s what we realized:
1- Our existing animation timeline is based on the standard format Pros are used to. For example if you ever used Adobe Flash or After Effects you would find our current Animation timeline a breeze as it closely follows the same concept.
2- Some of you complained: “Not so easy” - Novice users who have never animated or used professional tools would not take the time and find their way around the timeline features and give up.
This was unacceptable to us. After all the entire goal of Easy WebContent is to simplify the content creation process and the mission of our Presenter app is to allow everyone (Beginner to Pros) to coexist along side each other and visualize ideas and thoughts through interactive content.
Conclusion? We needed to have an Animation Engine geared for each of you, one that appeals to experiences users and one for the majority who have little to no animation experience.
And so today we are excited to announce the release of the Basic Timeline.
Starting today you will have two animation engines at your fingertips. One basic (just released which will be the default) and Advanced (for you creative types including myself who are not picky about pixel perfect movements and tweens).
Choice is yours: You have the freedom to access either one. They’re both intuitive and we’re confident no matter what your level of skill you will find one version or the other useful for your needs.
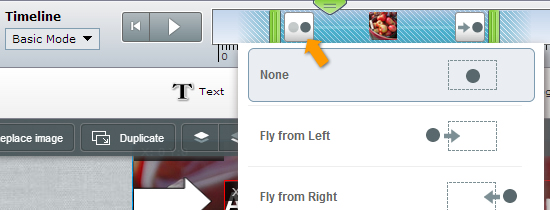
Each is accessible under the Timeline Area at top of the Application:
What makes Basic Timeline so easy?
It’s based on the concept of allowing you to concentrate on one object at a time. It is larger and allows easier clicking and dragging across different time zones. You can within one click choose a preset animation effect and apply it to your selected object. It’s so easy I bet your Grandma can do it (no pun intended).
Don’t believe me? Check it out in action on this short minute video below or login to your free account and take the new timeline for a test drive. (It’s free).
Still reading? Then let’s dig a bit further:
Here’s an example:
1- Place any object on your stage and select it if you wish to animate it.
2- On the Basic timeline click to turn on “Yes” for animating object.
As shown below a default animation will be created and you can click on the buttons at start or end of the time frame and apply your enter and exit presets.
- You can also stretch your time frame as to how long you want the object to remain on stage. For example above your see an object is made to enter stage at 1 second and then exit to the the right of stage at 6 seconds.
- You can also drag your time frame along timeline to position it in exact time you want it placed
But What if I already liked the existing timeline and know my way around; so what about me you ask?
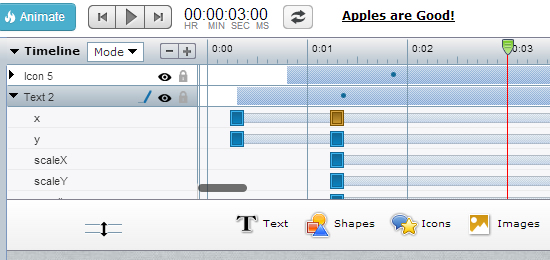
No worries. Interactive content is one of our top priorities and Presenter is created for both Novice and last but not least Advanced users. The same timeline you used before is available to you. Here’s how you can access it:
What’s the main difference between the Basic and Advanced Timeline?
If you notice on the Basic timeline you concentrate on one object at a time. This allow for applying animation more easily to an object. On the other hand the Advanced timeline allows you to see multiple objects with respect to each other. This means less real estate allocated to each item but freedom to get into the nuts and bolts of animation effects and allow you to visualize the animation as a whole.
Which one is for me?
We’ll leave that one up to you. With EWC Presenter we give you the freedom to use what you think is best for you. Generally speaking if you are new to animation the Basic timeline will be your preferred choice and you can always graduate to the Advanced version or even switch between them when you feel necessary depending on complexity of your project.
Still not convinced? Login to your account and please make sure to give us your feedback. We listen to you and want to give you the best experience possible. Create Awesome People!


 Payman Taei is the Founder of HindSite Interactive, an award winning web design and


I am quite interested in the potential of Presenter. However, I a the minister of a church and your prices (while reasonable) are beyond our budget. Do you happen to have an special pricing for nonprofits?
Thanks,
Tom Kadel
Sr. Pastor, Christ Lutheran Church
Kulpsville, PA
Hi Tom
Yes you should definitely take a little time and use Presenter and see the potential it will offer you. You noted concern on pricing; Please Note that Presenter is Free. You can use it without paying anything!
Our Site Builder and Site editor which are separate tools come with a trial period and then option to pay. Presenter is free. Check it out http://www.ewcPresenter.com